DIY Mona Lisa

Leonardo da Vinci’s Mona Lisa: it’s a portrait known all over the world, but not just for its incredible artistic quality. Whether you’ve seen the portrait in real life, or even just an image of it (such as the one above), you probably noticed something a little unnerving about it. No matter what angle you look at the painting, the woman is looking right at you! Her eyes follow you across the room (or from your phone or computer screen). Recently, I decided to change the background style on my iPhone to Perspective mode, and as I tilted to my phone around to see how it worked, it struck me. Because the picture looked the same at every angle that I examined, it felt to me almost the same as looking at the Mona Lisa!
A little bit of background for those who might not have iPhones: the Perspective mode is a particular setting that allows the user’s iPhone to adjust the positioning of the background image, in order to make it appear stil from different viewing angles. This concept of moving an object to make it appear still, although seemingly counterintuitive, is rooted in a concept from physics called parallax.
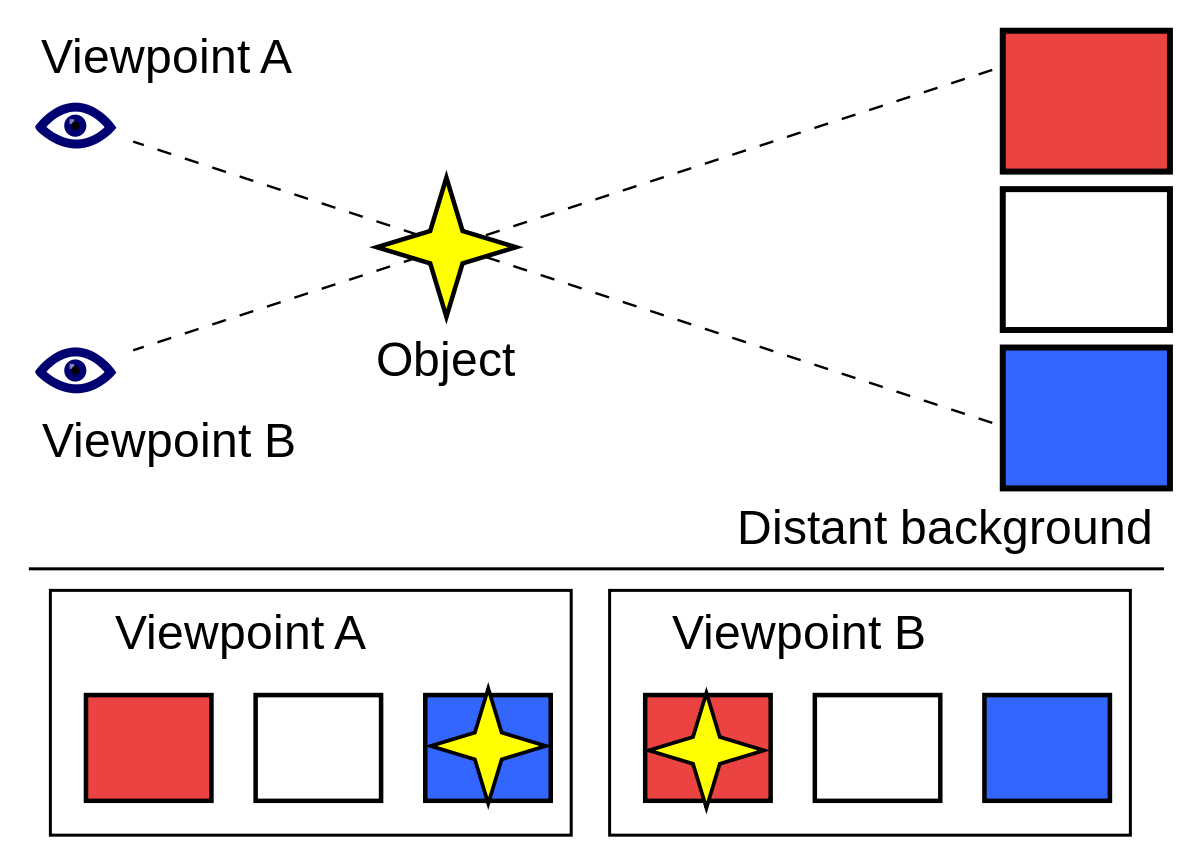
This image, from Wikipedia, may be a little confusing at first, but it illustrates parallax. A person looking at the “Object” (yellow star) from Viewpoint A, would see the star as if it were in front of the blue portion of the background, whereas a person looking at the star from Viewpoint B would see the star as if it were in front of the red portion of the background. Parallax itself is the apparent difference in position of an object when viewed from two different positions, so in this case the parallax would be the difference between seeing the star on the red or the blue background. Now how does this play into perspective background? The difference between two viewing positions is also known as a perspective shift. In the case of Apple’s Perspective mode, Apple takes your original image, zooms in a little, and actually pans the image slightly based on which direction you tilt your phone in, so that the true center of the image appears to remain centered.
Parallax comes into play in many different aspects of our lives, whether it be how we actually see or how we interact with technology, and even has applications in Virtual Reality (think about it- the image that the computer presents to you while wearing a VR headset changes based on what angle you tilt your head at). If you would like to see more examples of how some websites use parallax in their designs, you can check out this link: https://www.awwwards.com/30-great-websites-with-parallax-scrolling.html
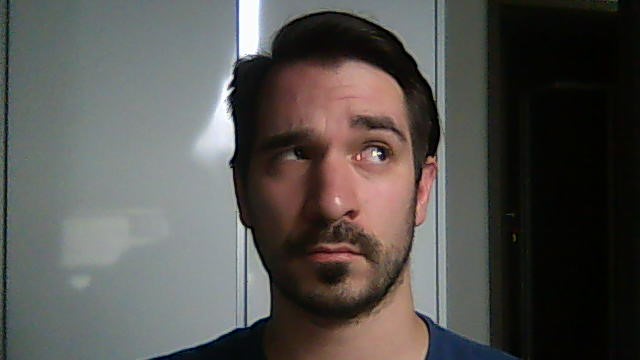
Let’s check out a coding project that uses a concept similar to parallax. This project displays, based on where the mouse is located on the screen, a slightly different picture of the same man whose eyes follow the mouse. It is called “I’m Watching You” and can be found at https://www.openprocessing.org/sketch/505703
[raw] [/raw]The project is structured in the following way:
- 21 different images are loaded into the project
- The screen is divided into a 3 row by 7 column “grid”
- The mouse’s position is determined
- The grid block that the mouse is in is determined by coordinates
- The corresponding image for that block is displayed
PImage[] up_imgs = new PImage[7];
PImage[] straight_imgs = new PImage[7];
PImage[] down_imgs = new PImage[7];
String path = "https://www.openprocessing.org/sketch/505703/files/";

void setup() {
	size(640,360);
	// Preload all the images.
	for (int i = 0; i < 7; i++) {
           up_imgs[i] = loadImage(path+"up_"+(i+1)+".jpg");
           straight_imgs[i] = loadImage(path+"straight_"+(i+1)+".jpg");
           down_imgs[i] = loadImage(path+"down_"+(i+1)+".jpg");
	}
}

void draw() {
	background(0);

	// Map the mouse x's position to look left/right.
	int xIndex = (int)(map(mouseX, 0, width, 0, up_imgs.length));

	// Map the mouse's y position to look up/down.
	if (mouseY < height/4) { image(up_imgs[xIndex], 0, 0); } else if (mouseY > height-height/4) {
		image(down_imgs[xIndex], 0, 0);
	} else {
		image(straight_imgs[xIndex], 0, 0);
	}
}
Another project that uses mouse position to display different images accordingly is called “Timepiece”. This project contains 8 images from a time lapse of a sun beam moving across a room. The sun beam image that is displayed correlates with the horizontal location of your mouse. The sun beam points furthest to the left when the mouse is on the far left of the screen, and furthest to the right when the mouse is on the far right.
[raw] [/raw]It can be found here: https://www.openprocessing.org/sketch/181087
Code for the sketch. You can edit and run this code on the KTBYTE CoderPImage eight;
PImage nine;
PImage ten;
PImage eleven;
PImage noon;
PImage one;
PImage two;
PImage three;
PImage four;
String path = "https://www.openprocessing.org/sketch/181087/files/";
void setup(){
size(880,880);
eight = loadImage(path+"eight.png");
nine = loadImage(path+"nine.png");
ten = loadImage(path+"ten.png");
eleven = loadImage(path+"eleven.png");
noon = loadImage(path+"noon.png");
one = loadImage(path+"one.png");
two = loadImage(path+"two.png");
three = loadImage(path+"three.png");
four = loadImage(path+"four.png");
}
void draw(){
if(mouseX < width/9){ image(four, 0, 0); } else if(mouseX > width/9 && mouseX < 3*width/9){ image(three, 0, 0); } else if(mouseX > 2*width/9 && mouseX < 4*width/9){ image(two, 0, 0); } else if(mouseX > 3*width/9 && mouseX < 5*width/9){ image(one, 0, 0); } else if(mouseX > 4*width/9 && mouseX < 6*width/9){ image(noon, 0, 0); } else if(mouseX > 5*width/9 && mouseX < 7*width/9){ image(eleven, 0, 0); } else if(mouseX > 6*width/9 && mouseX < 8*width/9){ image(ten, 0, 0); } else if(mouseX > 7*width/9 && mouseX < width){
image(nine, 0, 0);
}
}
The project is structured similarly to the “I’m Watching You Project”, but is a little less complex, because it does not have a two dimensional grid:
- 8 different images are loaded into the project
- The screen is divided into 8 columns
- The mouse’s x position is determined
- The column that the mouse is in is determined by coordinates
- The corresponding image for that column is displayed
Now that we’ve seen two examples of projects that use mouse tracking to display different images, it shouldn’t be too hard to make your own virtual version of a Mona Lisa, or even a parallax background. All you have to do is check the position of the mouse, or the angle that the phone is at, and adjust the image displayed.