Step 0: Easy Alternatives
Before you dive first into making a full blown website, make sure you have some experience:
– Writing a blog using
WordPress, Blogger, etc.
– Writing HTML/CSS for a static website on your computer, such as from
Codeacademy.
Step 1: Settings up a server
Create a free account on Amazon ec2, which will allow you to create a free server “micro” instance for 1 year. Creating an account requires a credit card and a phone number for activation.
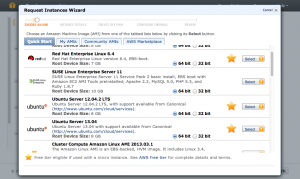
From within ec2, create a new instance. For the purpose of this tutorial, we will choose
Ubuntu Server 64 bit (14.04). Other versions of Ubuntu should work with this guide.
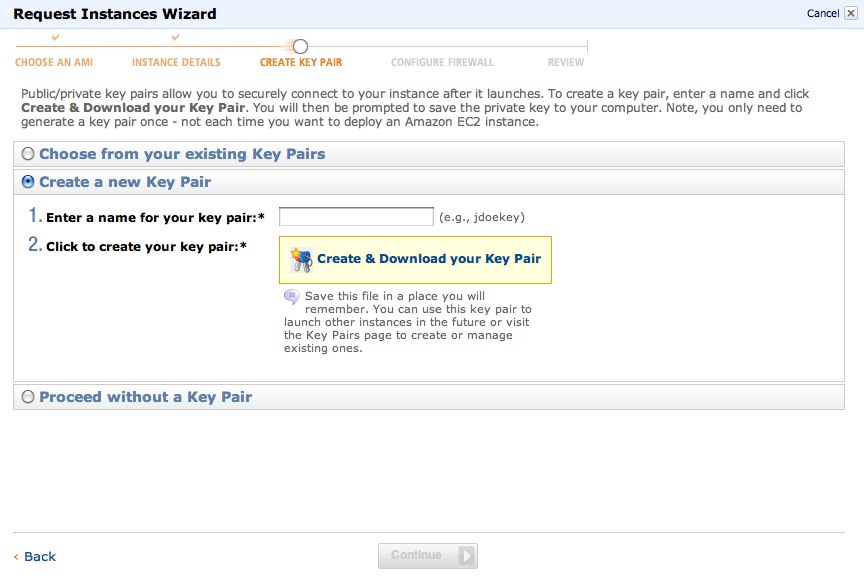
 Step 2: Create a key pair.
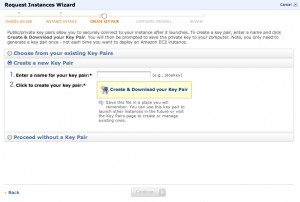
During the ec2 instantiation process, you will be asked to create a key pair. You can pick any name, but make sure to save this file in a place where it wont be deleted. Backup this file, as it is required to access your server.
 Step 3: Security Group Settings: Enable HTTP (and optionally HTTPS):
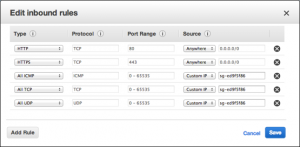
For your web server to be visible on the internet, you need to unblock port 80 (and optionally 443 for HTTPS).
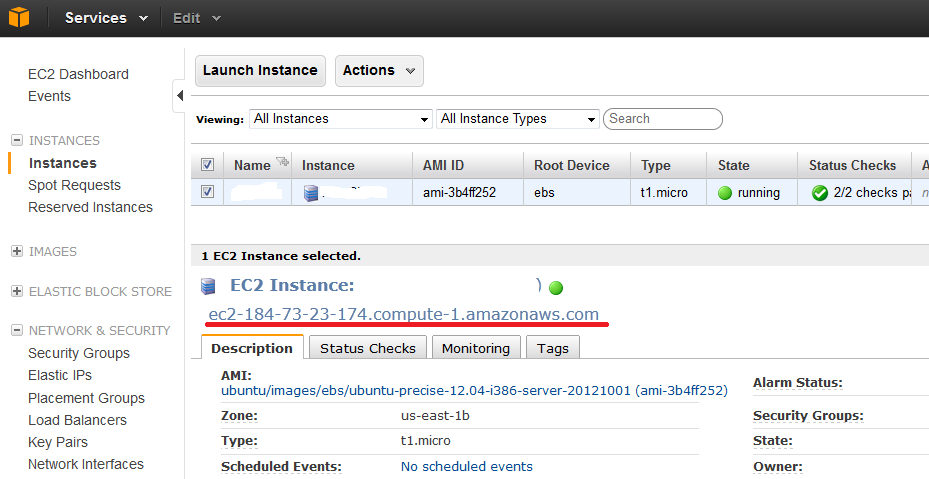
 Step 4: Start the new instance, and note the public DNS:
In the instances control panel, find the public DNS. This will be used to connect to the machine
 Step 5: SSH into your new machine
Step 5a: MacOSX / Linux
Step 5: SSH into your new machine
Step 5a: MacOSX / Linux
On a mac, use the already installed ssh command from the folder where you downloaded the secret key (“KeyPairName.pem”). You will need to change the DNS in this line:
ssh -i KeyPairName.pem ubuntu@ec2-xx-xxx-xxx-xxx.eu-west-1.compute.amazonaws.com
You may need to enter yes the first time to accept the public key.
Step 5b: Windows
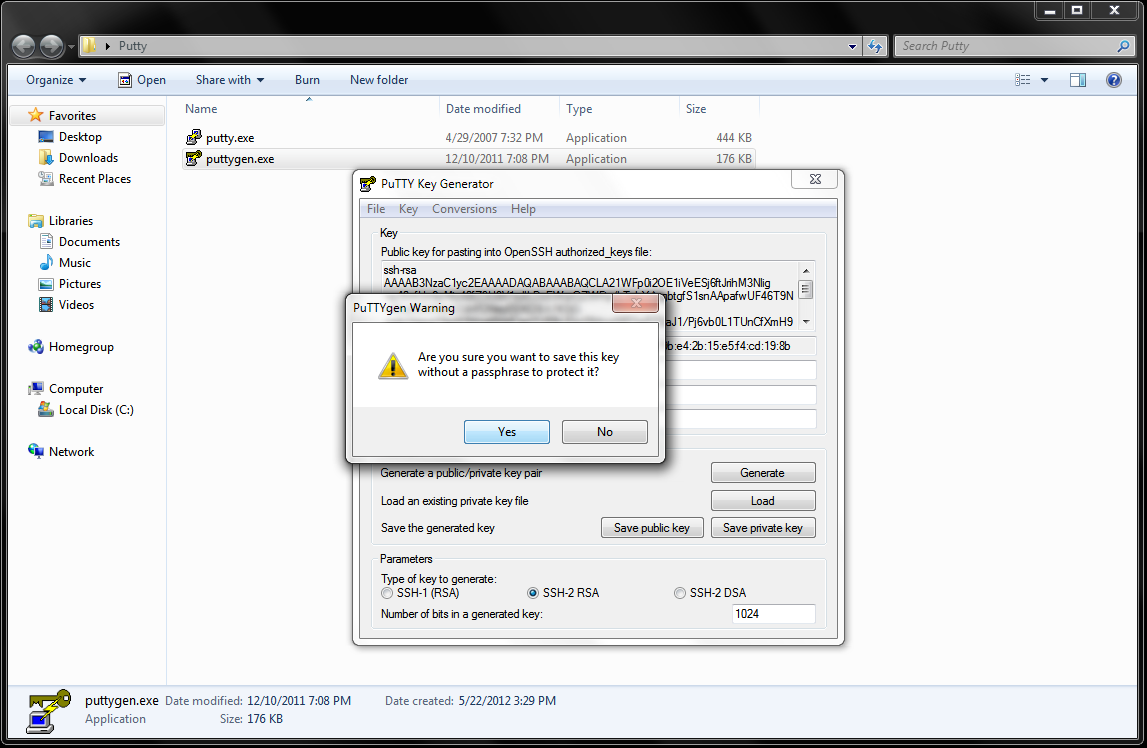
On Windows, download
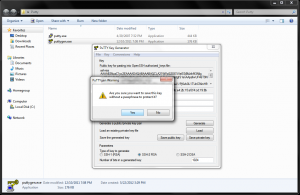
putty and puttygen. Using puttygen, load the private key (.pem) from step 2. You will need to select all file types when loading, since the extension does not match ppk. Then, save the private key.
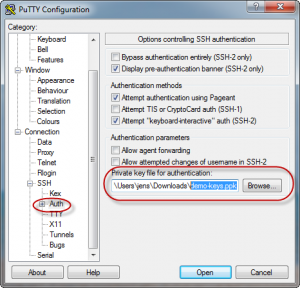
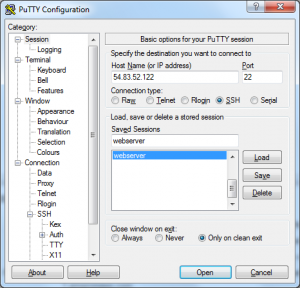
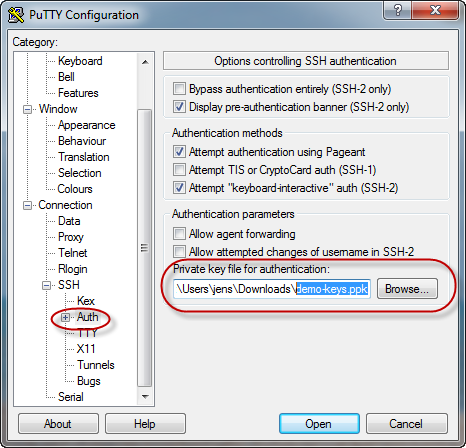
Then, in PuTTY, set the address to
ubuntu@ec2-xx-your-dns-here.compute.amazonaws.com, and also browse for the private key in Connections->SSH->Auth:
To save these settings later, type a session name on and save. Finally, connect to the machine with “open”
You may need to enter yes the first time to accept the public key.
Step 6: Install a web server, such as Apache2 :
After SSH-ing, type and run the following commands:
sudo apt-get update
sudo apt-get install apache2
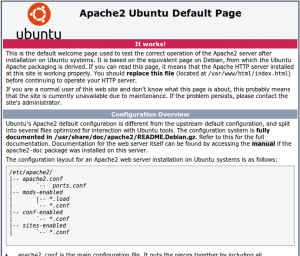
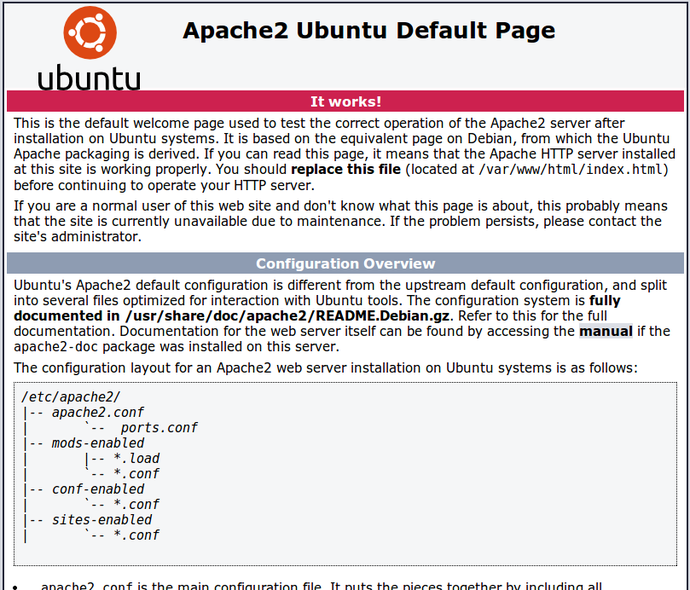
Step 7: Test your new website:
Go to http://
your-dns, and you should be greeted with the following page
 Step 8: Download an SCP client to upload files
You can skip this step if you are comfortable with using the linux terminal to modify files. All apache2 files are located in /var/www/html
Step 8: Download an SCP client to upload files
You can skip this step if you are comfortable with using the linux terminal to modify files. All apache2 files are located in /var/www/html
For windows, download
WinSCP. For MacOSX, use
cyberduck.
On both, you will login to ubuntu@yourdns.com . Additionally, you will need to specify the private key file:
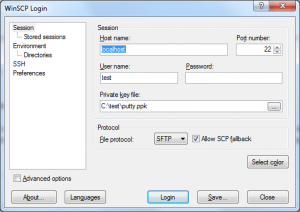
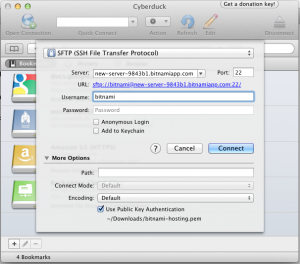
You should now be able to upload files to the /var/www/html directory.
Step 9: (Optional) Install MySQL, PHP5, and phpmyadmin:
This step is useful if you with to deploy a web application that uses PHP and MySQL (such as wordpress.org):
sudo apt-get install mysql-server libapache2-mod-auth-mysql php5-mysql phpmyadmin
Please note the MySQL root password during the installation process.
Step 10: (Optional) Install WordPress
From SSH, type cd /var/www/html to navigate to the web root.
a. Download and decompress wordpress:
sudo wget wget https://wordpress.org/latest.tar.gz
sudo tar -xzvf latest.tar.gz
b. Navigate to http://yourdns/phpmyadmin and login as root
Create a new database (collation) for wordpress
Create a new user, and add all permissions for the wordpress database
c. Navigate to http://yourdns/wordpress (or wherever your wordpress tar.gz was extracted)
Complete the instructions on screen by entering the login information from step b. You may be required to create a new file called wp-config.php. If so, do this from the terminal and within the wordpress directory:
sudo nano wp-config.php
#now you can paste the contents of wp-config
#now you can ctrl-x to quit (hit y to save)
d. Navigate again to http://yourdns/wordpress to complete the process
Step 11: Getting a free subdomain
To get a free subdomain, such as
mywebsite.mooo.com, you can use the afraid.org service.
After creating an account, add a new subdomain:
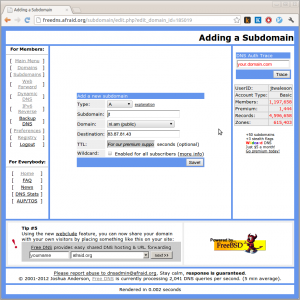
The type of the subdomain should be “A”, and the IP destination should be the IP address of your server. To get the IP address, you can type “ping
yourdns” in the terminal (cmd on windows).
 Step 2: Create a key pair.
During the ec2 instantiation process, you will be asked to create a key pair. You can pick any name, but make sure to save this file in a place where it wont be deleted. Backup this file, as it is required to access your server.
Step 2: Create a key pair.
During the ec2 instantiation process, you will be asked to create a key pair. You can pick any name, but make sure to save this file in a place where it wont be deleted. Backup this file, as it is required to access your server.
 Step 3: Security Group Settings: Enable HTTP (and optionally HTTPS):
For your web server to be visible on the internet, you need to unblock port 80 (and optionally 443 for HTTPS).
Step 3: Security Group Settings: Enable HTTP (and optionally HTTPS):
For your web server to be visible on the internet, you need to unblock port 80 (and optionally 443 for HTTPS).
 Step 4: Start the new instance, and note the public DNS:
In the instances control panel, find the public DNS. This will be used to connect to the machine
Step 4: Start the new instance, and note the public DNS:
In the instances control panel, find the public DNS. This will be used to connect to the machine
 Step 5: SSH into your new machine
Step 5a: MacOSX / Linux
On a mac, use the already installed ssh command from the folder where you downloaded the secret key (“KeyPairName.pem”). You will need to change the DNS in this line:
Step 5: SSH into your new machine
Step 5a: MacOSX / Linux
On a mac, use the already installed ssh command from the folder where you downloaded the secret key (“KeyPairName.pem”). You will need to change the DNS in this line:
 Then, in PuTTY, set the address to ubuntu@ec2-xx-your-dns-here.compute.amazonaws.com, and also browse for the private key in Connections->SSH->Auth:
 To save these settings later, type a session name on and save. Finally, connect to the machine with “open”
 You may need to enter yes the first time to accept the public key.
Step 6: Install a web server, such as Apache2 :
After SSH-ing, type and run the following commands:
You may need to enter yes the first time to accept the public key.
Step 6: Install a web server, such as Apache2 :
After SSH-ing, type and run the following commands:
 Step 8: Download an SCP client to upload files
You can skip this step if you are comfortable with using the linux terminal to modify files. All apache2 files are located in /var/www/html
For windows, download WinSCP. For MacOSX, use cyberduck.
On both, you will login to ubuntu@yourdns.com . Additionally, you will need to specify the private key file:
Step 8: Download an SCP client to upload files
You can skip this step if you are comfortable with using the linux terminal to modify files. All apache2 files are located in /var/www/html
For windows, download WinSCP. For MacOSX, use cyberduck.
On both, you will login to ubuntu@yourdns.com . Additionally, you will need to specify the private key file:

 You should now be able to upload files to the /var/www/html directory.
Step 9: (Optional) Install MySQL, PHP5, and phpmyadmin:
This step is useful if you with to deploy a web application that uses PHP and MySQL (such as wordpress.org):
You should now be able to upload files to the /var/www/html directory.
Step 9: (Optional) Install MySQL, PHP5, and phpmyadmin:
This step is useful if you with to deploy a web application that uses PHP and MySQL (such as wordpress.org):
 The type of the subdomain should be “A”, and the IP destination should be the IP address of your server. To get the IP address, you can type “ping yourdns” in the terminal (cmd on windows).